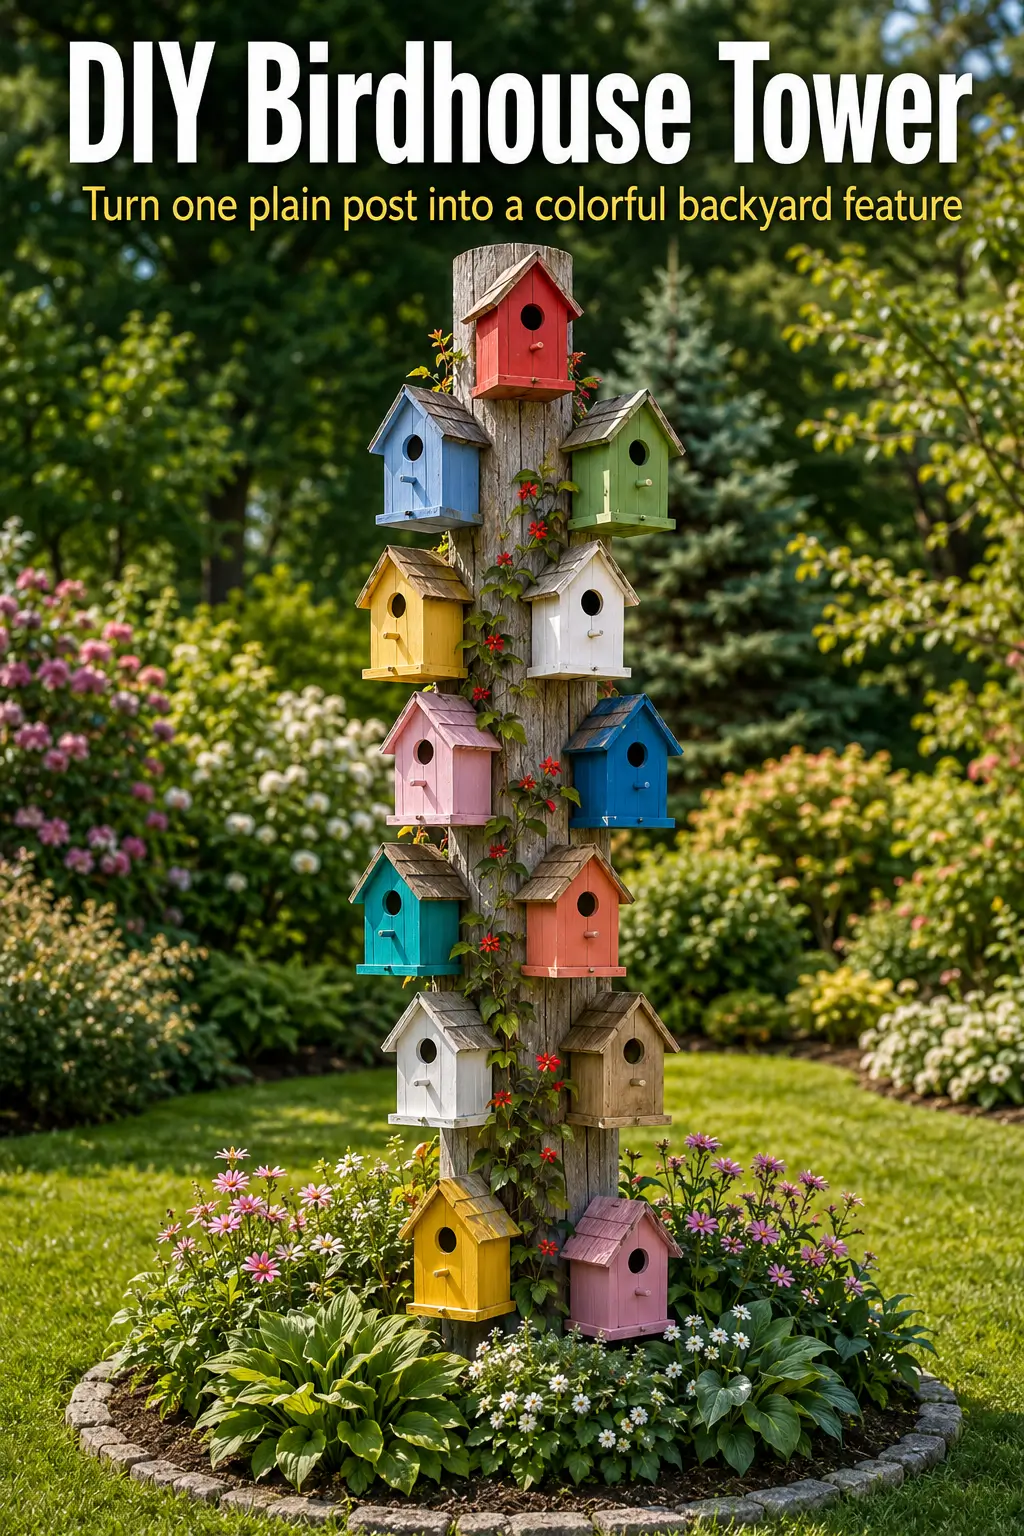
A simple garden post can become one of the most charming features in your backyard. Instead of leaving a plain wooden post unused, you can turn it into a colorful birdhouse tower filled with personality, height, and cottage-garden charm.
This project works beautifully as a decorative focal point in a flower bed, lawn corner, pollinator garden, or near a backyard path. The stacked birdhouses add color and vertical interest, while climbing vines and flowers can soften the post and make it feel like part of the garden.
It is important to be realistic: a birdhouse tower like this is mostly decorative. Some birds may use the houses if the size, placement, entrance hole, and location are right, but not every birdhouse will become active. The main goal is to create a beautiful garden feature that can also support wildlife when designed carefully.
Why This Birdhouse Tower Works
A birdhouse tower works because it adds height to the garden without taking up much ground space. Many flower beds are low and wide, so a tall vertical feature can make the whole area feel more designed and complete.
The colorful birdhouses bring a cheerful handmade look. When they are spaced clearly around the post, each little house becomes part of the display instead of looking cluttered.
This idea also works well because it can be customized. You can use soft cottage colors, bright rainbow colors, natural wood tones, or a mix of painted and unfinished houses.
Placing flowers and foliage around the base helps the tower blend into the garden. Hostas, daylilies, lavender, ornamental grasses, salvia, geraniums, and low annual flowers can all help make the post look more natural.
What You Need
To build a simple birdhouse tower, you will need:
- One sturdy wooden post, about 6 to 8 feet tall
- Post hole digger or shovel
- Gravel for drainage at the base of the post
- Fast-setting concrete or packed gravel for securing the post
- 8 to 12 small wooden birdhouses
- Outdoor paint or exterior wood stain
- Paintbrushes
- Exterior screws
- Drill
- Screwdriver bit
- Measuring tape
- Pencil
- Level
- Outdoor wood sealer
- Small metal brackets, optional
- Climbing vine support wire, optional
- Garden gloves
- Safety glasses
- Mulch and flowers for the base planting
For the post, a 4×4 treated wooden post is a practical choice. If you prefer a more rustic look, you can use a cedar or rot-resistant wooden post.
For birdhouses, use weather-resistant wooden houses. Avoid flimsy indoor craft birdhouses unless you plan to use the tower only as temporary decoration.
Best Placement for a Birdhouse Tower
Choose a location where the tower can be seen and enjoyed. Good spots include the center of a round flower bed, the back of a border, near a garden path, beside a patio, or in an open lawn corner.
The tower should be placed where it will not block walkways or make mowing difficult. It should also be away from heavy foot traffic if you hope birds might use the houses.
If you want the birdhouses to be more bird-friendly, choose a quieter area with nearby shrubs or trees for shelter. Avoid placing the tower too close to outdoor speakers, busy doors, or areas where pets often roam.
Make sure the post is not directly under a roofline where rain pours down heavily. Too much water can shorten the life of the birdhouses.
Step-by-Step Instructions
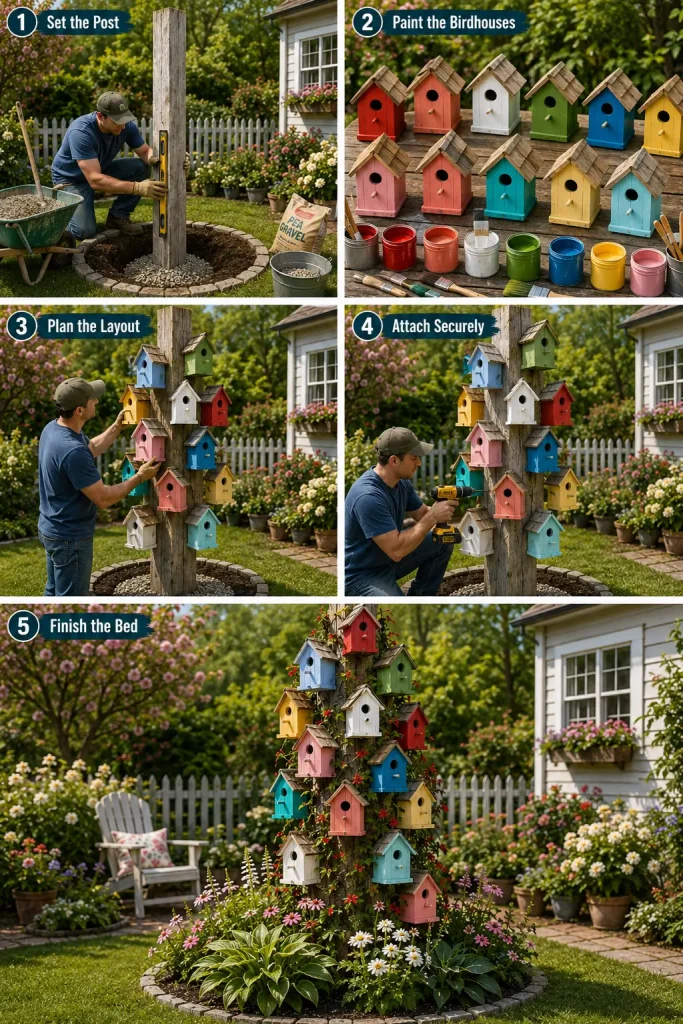
Step 1: Choose and Prepare the Post
Start with a sturdy wooden post about 6 to 8 feet tall. A 4×4 post works well because it gives enough surface for attaching multiple birdhouses.
If the post is unfinished wood, sand rough edges before installing it. You can leave it natural for a rustic look or stain it with an outdoor wood stain.
For a softer garden style, use a light weathered gray, warm cedar, or natural wood finish. This helps the colorful birdhouses stand out without making the tower look too busy.
Step 2: Set the Post Securely
Dig a hole about 18 to 24 inches deep. The taller the post, the deeper and stronger the base should be.
Add a few inches of gravel to the bottom of the hole for drainage. Place the post in the hole and use a level to make sure it stands straight.
Secure the post with fast-setting concrete or tightly packed gravel. Concrete gives the strongest hold, especially if your area gets wind.
Let the post set fully before attaching birdhouses. Do not rush this step because the tower needs to stay stable.
Step 3: Paint the Birdhouses
Paint each birdhouse with outdoor paint. You can use a bright garden palette, such as red, yellow, blue, green, coral, pink, turquoise, and white.
For a more natural look, use soft muted colors like sage green, dusty blue, cream, terracotta, pale yellow, and weathered red.
Avoid painting the inside of birdhouses if you want birds to use them. Paint only the outside and let everything dry completely.
After the paint dries, apply a clear outdoor sealer to help protect the wood from rain and sun.
Step 4: Plan the Layout Before Attaching
Before drilling, arrange the birdhouses around the post to decide where each one will go.
Space them on different sides of the post instead of stacking them directly above each other in one straight line. This makes the tower look more balanced and gives each house its own space.
Leave several inches between birdhouses so the entrance holes stay visible and open. Avoid placing one house directly in front of another entrance.
A good layout is to stagger the houses from bottom to top, turning them slightly around the post as they go upward.
Step 5: Attach the Birdhouses Securely
Use exterior screws to attach each birdhouse to the wooden post. A drill makes this easier and gives a stronger hold than nails.
For heavier birdhouses, use small metal brackets underneath for extra support.
Make sure each house is firmly attached and does not wobble. Wind, rain, and seasonal temperature changes can loosen weak attachments over time.
Do not use glue alone. Outdoor glue may fail in wet weather, especially on painted surfaces.
Step 6: Keep Entrances Open
Make sure every birdhouse entrance hole is clear and visible. Do not let vines, flowers, or decorations cover the openings.
If the tower is mainly decorative, you can use different house sizes and colors. If you want to encourage actual nesting birds, use birdhouse sizes and entrance holes suitable for birds in your area.
Many small cavity-nesting birds prefer simple, safe houses with proper drainage, ventilation, and easy cleaning access.
Step 7: Add Plants Around the Base
Plant flowers and foliage around the bottom of the post to soften the base.
Good plants for the base include:
- Hostas for shade or part shade
- Daylilies for sunny beds
- Lavender for sunny, dry edges
- Salvia for pollinators
- Catmint for soft purple blooms
- Geraniums for cottage color
- Ornamental grasses for texture
- Alyssum or creeping thyme for low edging
Keep plants from growing too thickly up the post if you want birds to use the houses. Light climbing vines can look beautiful, but they should not block entrances or trap moisture against the wood.
Step 8: Add Mulch and Finish the Bed
Add mulch around the base planting to help reduce weeds and keep the bed neat. Keep mulch a few inches away from the wooden post to prevent moisture buildup.
Step back and check the overall look. The tower should feel tall, colorful, and balanced, not overloaded.
If one side looks empty, you can add one more birdhouse or a small trailing plant near the base.
Birdhouse Tower Safety Tips
The post must be stable before you add weight to it. If the post moves when pushed, it needs a stronger base.
Use outdoor-rated screws, paint, and sealer. Indoor materials may peel, rust, or break down quickly outside.
Avoid sharp exposed screws or rough metal edges. Birds, children, pets, and gardeners can all be injured by poorly finished hardware.
If the tower is near a play area, make sure the lower birdhouses are attached securely and do not have loose parts.
Do not overload the post. A few well-spaced birdhouses look better and are safer than too many crowded houses.
Bird-Friendly Notes
If you want the tower to be more than decoration, keep the design practical for birds.
Birdhouses should have small drainage holes in the bottom and ventilation near the top. They should also be easy to clean after nesting season.
Avoid perches under the entrance holes. Perches are not usually needed by small nesting birds and can make it easier for predators to access the house.
Place the tower where birds feel safe. Nearby shrubs and trees can help, but dense vines covering the houses may make them less useful.
Do not be disappointed if birds do not use every house. In many gardens, a colorful birdhouse tower is mainly decorative, and any bird activity is a bonus.
Best Plants to Grow Around a Birdhouse Tower
The plants around the base should make the tower feel like part of the garden.
For a sunny flower bed, try daylilies, salvia, lavender, catmint, black-eyed Susans, coneflowers, marigolds, or ornamental grasses.
For part shade, try hostas, coral bells, ferns, astilbe, hardy geraniums, or impatiens.
For a cottage look, mix soft flowers with leafy plants. Use taller plants behind the post and lower plants around the front edge.
Do not plant aggressive vines that may cover the birdhouses completely. If you use a vine, choose one you can prune easily.
Maintenance Tips
Check the tower at least once or twice a year. Tighten loose screws and look for cracked wood, peeling paint, or unstable birdhouses.
Refresh paint or sealer when needed. Bright colors may fade in strong sun, so outdoor paint is important.
Trim plants around the base so they do not cover the lower birdhouses. If vines are used, guide them carefully and keep entrance holes open.
After nesting season, clean birdhouses that were used, if the design allows safe cleaning. Wear gloves and follow local wildlife guidelines.
In winter, check that snow or heavy rain is not damaging the houses. Replace damaged birdhouses before they fall.
Common Mistakes to Avoid
Crowding Too Many Birdhouses Together
Too many houses packed tightly on one post can look messy and may be less useful for birds. Space them clearly so each house can be seen.
Using Weak Indoor Craft Houses
Thin craft birdhouses may not last outdoors. Choose sturdy wooden houses and protect them with outdoor paint or sealer.
Forgetting to Secure the Post
A tall tower catches wind. The post must be set firmly in the ground before birdhouses are attached.
Covering the Entrance Holes
Vines and flowers look beautiful, but they should not block the openings. Keep each entrance visible and clear.
Using Glue Instead of Screws
Glue alone is not reliable for an outdoor birdhouse tower. Use exterior screws for a stronger attachment.
Placing the Tower in a Busy Area
If you want birds to use the houses, avoid high-traffic spots. A quiet garden corner is better than a busy patio entrance.
Expecting Every House to Be Used
This project is best treated as a decorative garden feature. Birds may use some houses, but they may ignore others depending on location, size, and nesting needs.
FAQ
How tall should a birdhouse tower be?
A birdhouse tower usually looks best at about 6 to 8 feet tall. The post should be tall enough to create a focal point but not so tall that it becomes unstable or difficult to maintain.
What kind of post should I use?
A sturdy 4×4 wooden post is a practical choice. Cedar or pressure-treated wood can work well outdoors. If using treated wood, avoid placing edible plants too close to the base.
How many birdhouses should I put on one post?
For a balanced look, use about 8 to 12 small birdhouses on a tall post. Smaller posts may only need 5 to 7. The key is to space them clearly.
Will birds actually use a birdhouse tower?
Birds may use some of the houses if the size, entrance hole, location, and safety conditions are right. However, this project should be treated mainly as a decorative garden feature.
Should birdhouses have perches?
Perches are usually not necessary for small nesting birds. In some cases, perches can make it easier for predators to reach the entrance.
What colors are best for birdhouses?
Soft natural colors, white, green, blue, red, yellow, and muted cottage colors can all look beautiful. If the birdhouses are meant for real nesting, avoid dark colors in very hot sunny areas because they can absorb more heat.
Can I grow vines on the birdhouse tower?
Yes, but choose light vines and keep them trimmed. Do not let vines cover entrance holes, trap moisture, or make the houses hard to clean.
Where should I place a birdhouse tower?
Place it in a flower bed, lawn corner, backyard border, or quiet garden area. If you want birds to use it, choose a calmer spot away from heavy traffic and pets.
Conclusion
A DIY birdhouse tower is a beautiful way to turn one plain garden post into a colorful backyard feature. It adds height, charm, and personality to a flower bed while creating a playful focal point that feels handmade and welcoming.
The most important details are simple: use a sturdy post, attach each birdhouse securely, space the houses clearly, and keep the entrance holes open.
Whether birds use the houses or not, this project can bring color and life to the garden. With flowers around the base and a few carefully chosen birdhouse colors, one simple post can become a standout feature in your backyard.