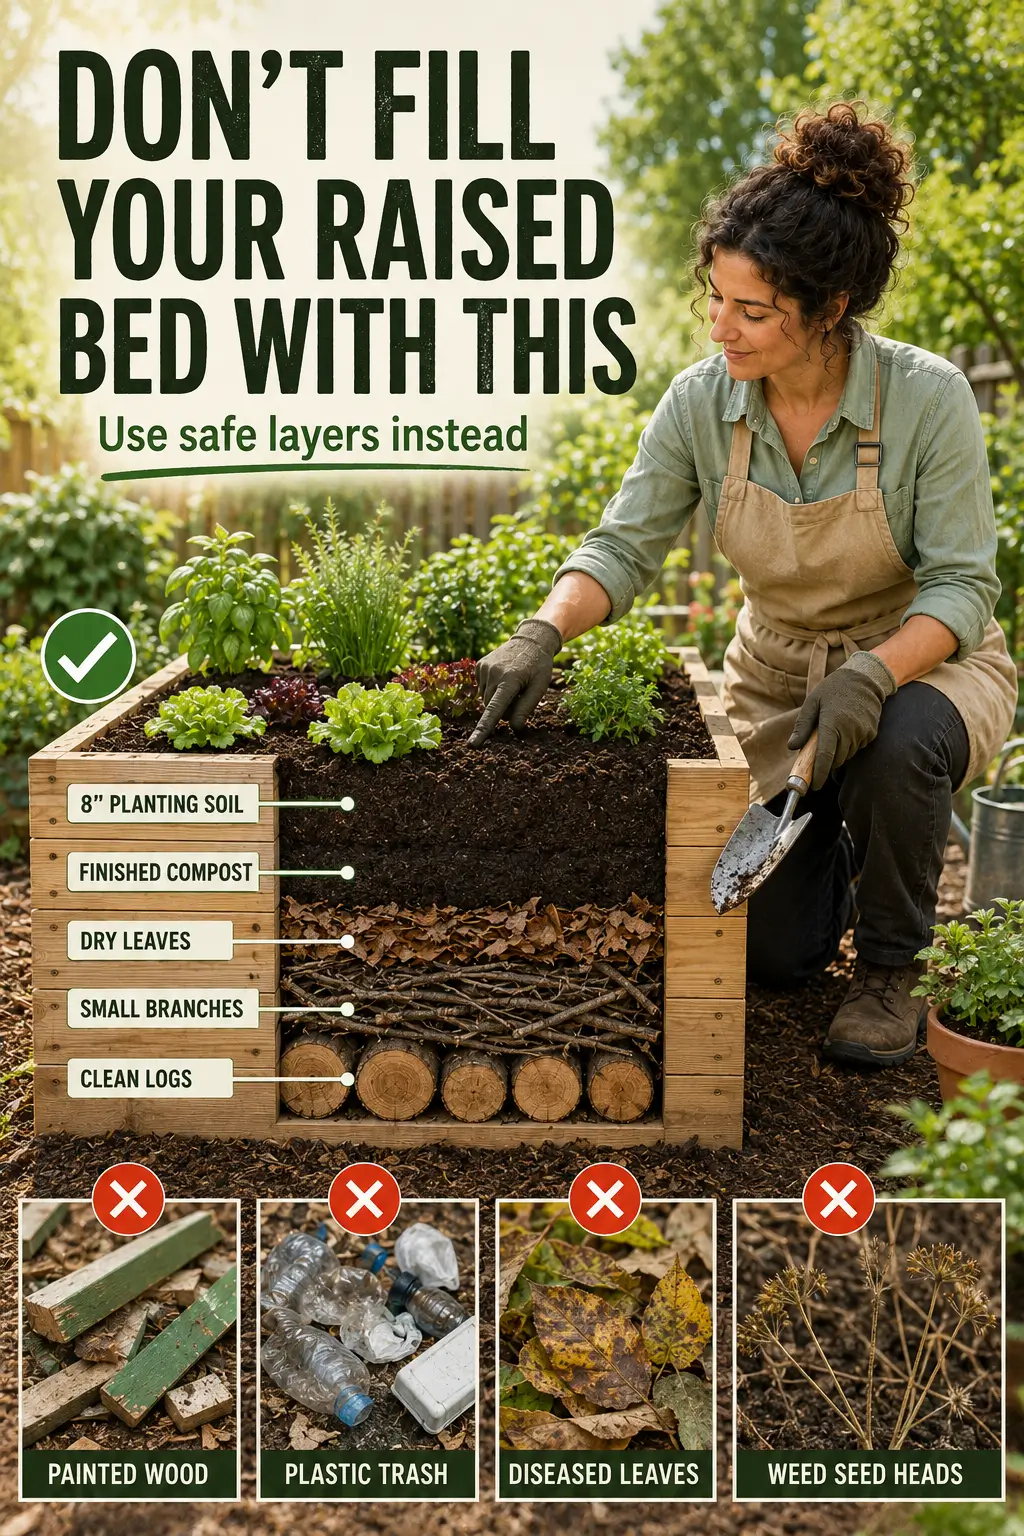
Filling a raised bed can get expensive fast, especially if you try to fill the entire box with bagged garden soil. The good news is that deeper raised beds do not always need premium soil from bottom to top. You can use safe organic materials in the lower layers, then save your best soil for the planting zone where roots need it most.
The key is knowing what belongs in the bottom of a raised bed and what should never go inside. Clean logs, small branches, dry leaves, compost, and quality planting soil can work well when layered correctly. But pressure-treated wood, painted scraps, diseased plants, seed-filled weeds, plastic trash, fresh manure, and certain toxic woods can create problems that last for years.
This guide explains how to fill a raised bed safely, reduce soil costs, improve drainage, and avoid contamination mistakes.
Why This Idea Works
Raised beds need enough good soil for plants to grow strong roots, but the bottom of a deep bed can often be filled with bulky organic material. As logs, branches, leaves, and compost slowly break down, they add organic matter and help build a more natural soil structure.
This method is often inspired by hugelkultur gardening, where woody materials are buried under soil and allowed to decompose over time. It can be useful for tall raised beds, especially when you want to reduce the amount of expensive bagged soil needed.
However, it is not magic. Beds can settle as the lower layers break down, and plants still need a deep top layer of quality soil. For most vegetables, herbs, and annual flowers, the top 6–10 inches should be good planting soil mixed with compost. Deep-rooted crops may need even more.
What You Need
For a safe raised bed filling method, use clean, natural materials only.
Good bottom layer materials:
- Clean untreated logs
- Small branches and twigs
- Dry leaves
- Straw or dried grass clippings without herbicides
- Finished compost
- Aged manure, only if fully composted
- Native soil, if it is healthy and not contaminated
- High-quality raised bed soil or garden soil for the top layer
Tools that help:
- Garden gloves
- Shovel
- Rake
- Wheelbarrow
- Pruners or loppers
- Garden hose
- Soil thermometer, optional
- Compost fork, optional
Avoid using materials that may contain chemicals, weed seeds, disease, or toxins.
Best Placement or Setup
Before filling the raised bed, place it in the right spot. Most vegetables need 6–8 hours of direct sun per day, though leafy greens and some herbs can handle partial sun.
Choose a level area with good access to water. Avoid placing raised beds where water pools after rain. Even raised beds can have drainage issues if the ground underneath stays soggy.
If placing the bed over grass, remove thick weeds first or cover the bottom with plain cardboard. Use cardboard only if it is free of glossy coating, tape, and plastic labels. It can help smother grass while still breaking down naturally.
For wooden raised beds, use rot-resistant untreated lumber such as cedar, redwood, or untreated pine. Avoid old boards if you do not know whether they were painted, stained, or chemically treated.
Step-by-Step Instructions
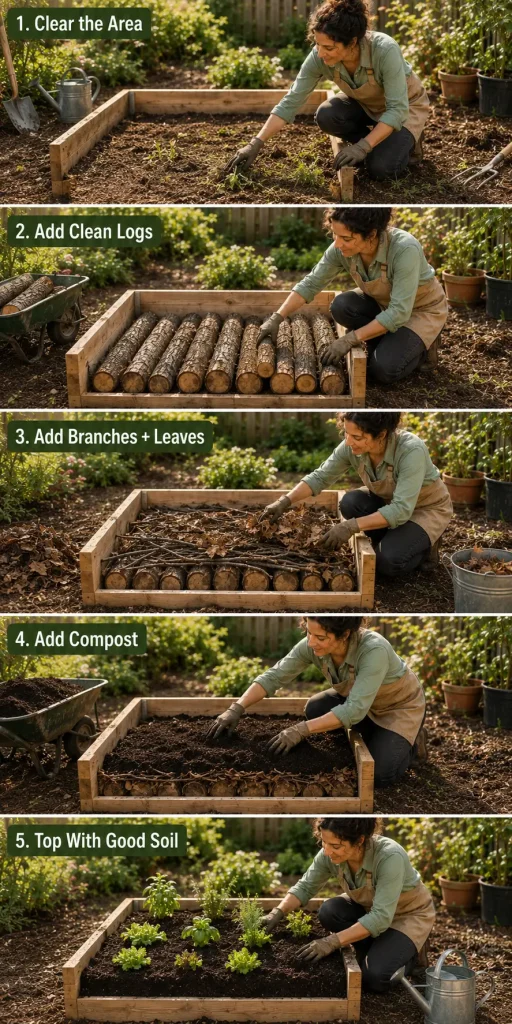
1. Clear the Area
Remove trash, rocks, aggressive weeds, and thick grass from the bed area. If there are perennial weeds with deep roots, pull out as much of the root system as possible.
Do not bury weeds that already have seed heads. Many weed seeds can survive and later sprout inside the bed.
2. Add a Safe Base Layer
Place clean, untreated logs or thick branches at the bottom of the raised bed. This layer works best in taller beds, usually around 18 inches deep or more.
Use wood that is natural and unpainted. Good options include hardwood branches, fruit tree prunings from healthy trees, maple, oak, alder, poplar, or similar untreated wood.
Avoid black walnut wood because it contains juglone, a natural compound that can harm some garden plants. Also avoid pressure-treated wood, painted wood, stained wood, plywood, particle board, and old construction scraps.
3. Fill Gaps With Smaller Branches and Twigs
Add smaller sticks, twigs, and woody pieces around the logs. This helps fill air pockets and creates a more stable base.
Do not pack this layer too tightly. Some air space is okay, but large empty gaps can cause the bed to sink unevenly later.
4. Add Leaves and Brown Organic Matter
Cover the woody layer with dry leaves, straw, or dried grass clippings. These materials help fill spaces and break down over time.
Only use grass clippings if the lawn has not been treated with herbicides. Avoid thick mats of fresh green grass because they can become slimy and smell bad if they compact without enough air.
5. Add Compost
Spread a layer of finished compost over the leaves and branches. Compost helps introduce beneficial microbes and gives the bed a better start.
Use finished compost that smells earthy, not sour or rotten. Avoid fresh manure because it can burn plants, smell unpleasant, attract flies, and may contain harmful pathogens if not properly aged or composted.
6. Add Quality Soil on Top
The top 6–10 inches should be your best growing layer. Use a raised bed soil mix, garden soil blended with compost, or a custom mix that drains well but still holds moisture.
This top layer is where most young vegetable roots begin growing, so do not fill it with rough mulch, wood chips, heavy clay, or unfinished compost. Plants need loose, fertile, well-draining soil near the surface.
For root crops like carrots, beets, radishes, and potatoes, give them a deeper layer of loose soil without large chunks of wood near the planting zone.
7. Water the Bed Well
After filling, water the bed deeply to help the layers settle. You may notice the soil level drops after watering. This is normal.
Add more soil or compost as needed until the bed is filled to about 1–2 inches below the top edge. Leaving a little space helps keep soil and mulch from washing out.
8. Let It Settle Before Planting When Possible
If you can, fill the bed a few weeks before planting. This gives the materials time to settle and lets you top off the soil before adding plants.
If you need to plant right away, it can still work. Just expect some settling during the first season and keep extra compost or soil nearby for topping up.
What Not to Put in a Raised Bed
Some materials may seem useful for filling space, but they can create long-term problems.
Avoid these materials:
Pressure-treated wood: It may contain chemicals that you do not want near edible crops.
Painted or stained wood: Paint and stain may contain unwanted chemicals, especially on older boards.
Diseased plants: Plant diseases can survive in debris and spread to new crops.
Weeds with seeds: These can turn your raised bed into a weed patch.
Fresh manure: It can burn roots, smell bad, attract pests, and may carry pathogens if not composted properly.
Plastic trash: Plastic does not belong in garden soil and can break into smaller pieces over time.
Glossy cardboard or printed packaging: These may contain coatings, inks, tape, or plastic layers.
Black walnut wood: It can release juglone, which may harm sensitive plants like tomatoes, peppers, potatoes, eggplants, and some flowers.
Large amounts of fresh wood chips in the top soil layer: Wood chips are fine as mulch on top, but mixing too much fresh wood into the root zone can temporarily tie up nitrogen as it breaks down.
Care Tips
Check the soil level every few weeks during the first growing season. Raised beds filled with organic layers often settle, especially after rain and watering.
Top off the bed with compost and quality soil as needed. A yearly 1–2 inch layer of compost can help refresh nutrients and improve soil texture.
Mulch the surface with straw, shredded leaves, or untreated wood chips to reduce moisture loss and keep soil temperatures more stable. Keep mulch slightly away from plant stems to reduce rot problems.
Water deeply instead of giving the bed quick shallow watering. Raised beds can dry out faster than in-ground gardens, especially in hot weather.
If plants look pale or slow-growing, they may need extra nitrogen, especially in beds with lots of woody material underneath. Add compost, organic fertilizer, or a balanced vegetable fertilizer according to label directions.
Common Mistakes to Avoid
One common mistake is filling the entire bed with rough branches and then adding only a thin layer of soil. Most vegetables need enough loose soil for roots, so keep the top 6–10 inches as a quality planting layer.
Another mistake is using questionable wood. If you do not know whether wood is treated, painted, stained, or contaminated, do not use it in a vegetable bed.
Do not bury diseased tomato vines, squash leaves with mildew, or pest-infested plants inside the bed. Composting diseased material requires proper heat and management, and many home compost piles do not get hot enough.
Avoid adding fresh manure right before planting. Use only finished compost or properly aged manure, especially for edible crops.
Also, do not forget about settling. A newly filled bed may look full at first, then drop several inches after watering and decomposition. This is normal, but you should be ready to refill the top with compost and soil.
FAQ
Can I fill the bottom of a raised bed with logs?
Yes, clean untreated logs can be used in the bottom of a deep raised bed. They work best under a layer of branches, leaves, compost, and at least 6–10 inches of quality soil. Avoid treated, painted, stained, or black walnut wood.
How much good soil should be on top of a raised bed?
For many vegetables and herbs, the top 6–10 inches should be good planting soil mixed with compost. Root crops and deep-rooted plants may need more loose soil.
Can I put cardboard at the bottom of a raised bed?
Plain cardboard can be used to smother grass or weeds under a raised bed. Remove tape, labels, staples, and glossy coatings first. Do not use shiny printed packaging or plastic-coated cardboard.
Can I use wood chips to fill a raised bed?
Wood chips can be used lower in the bed or as mulch on top, but avoid mixing large amounts of fresh wood chips into the top planting soil. Fresh wood can temporarily reduce nitrogen availability as it decomposes.
Is fresh manure safe in raised beds?
Fresh manure is not recommended right before planting. It can burn plants and may carry pathogens. Use finished compost or properly aged manure instead.
Why is my raised bed sinking?
Raised beds often sink because organic materials like logs, leaves, compost, and branches settle and decompose. Top off the bed with compost and soil as needed, especially during the first year.
Can I plant immediately after filling a raised bed?
Yes, you can plant right away if the top layer is good-quality soil. However, the bed may settle, so keep extra compost and soil ready. If possible, filling the bed a few weeks before planting is even better.
What should never go in a raised bed?
Avoid pressure-treated wood, painted wood, diseased plants, weeds with seeds, fresh manure, plastic trash, glossy cardboard, black walnut wood, and anything that may be chemically contaminated.
Conclusion
A raised bed does not need to be filled from top to bottom with expensive soil, but it does need to be filled safely. Clean logs, small branches, leaves, compost, and quality soil can create a practical layered bed that saves money and supports healthy plant growth.
The most important rule is to keep questionable materials out and reserve the top 6–10 inches for good soil where roots can grow well. With safe materials, proper layering, good drainage, and regular topping off, your raised bed can become a productive garden space without wasting money or risking contamination.